
Hide Hard Drives Partitions(C:,D:,E: etc.):
This is a great trick you can play on your friends. To disable the display
of local or networked drives when you click My Computer.
1.Go to start->run.Type regedit.Now go to:
HKEY_CURRENT_USER\Software\Mi
Now in the right pane create a new DWORD item and name it NoDrives(it is case sensitive). Now modify it's value and set it to 3FFFFFF
(Hexadecimal) .Now restart your computer. So, now when you click on
My Computer, no drives will be shown(all gone...). To enable display of
drives in My Computer, simply delete this DWORD item that you created.
Again restart your computer.You can now see all the drives again.
Hiding a partition or volume from my computer or explorer is preventing that partition from displaying, but it doesn't mean erasing any data or deleting the volume. Windows OS Disk management system allows hiding drives except the System drive where the OS is installed and the System reserved volume. So, anyone who has administrative privilege or the administrator of the Windows machine can do this task. And the basic trick is, without any drive letter (Ex: C:, D:, E: etc.) Windows OS doesn't recognize any drive or partition and here we are going to remove that letter temporally.
To do this task you need administrator privilege. So, why don't you activate the administrator account and use it.
How to hide a drive:
1. Click right mouse on the computer and select Manage. Select the disk management under storage from the left pane. Or, you can also get the Disk management typing diskmgmt.msc in the run and pressing enter.
2. From there click right-mouse on which drive you want to hide and select Change Drive Letters and Paths.
3. Now select remove. Don’t worry! This action just removes the drive letter.
4. Pressing on the Remove a warning message will be shown and accept it by clicking on yes. It’s just telling you that all programs installed on that drive won’t work or this drive is opened by another program.
It’s done! Your selected drive is hidden now.
The hidden drive won’t be appearing to the administrator of the OS unless it is unbidden.
How to unhide the drive:
1. Open the Disk Management as shown above.
2. Right mouse click on the drive which is hidden/removed. Tips: the hidden drive doesn’t contain any drive letter.
3. Choose the Change Drive Letters and Paths and select Add to add drive letter or path to the hidden drive.
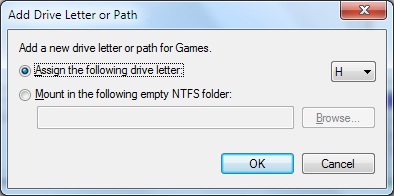
4. At last choose a drive letter to assign the drive/partition and press on OK. Wow! The hidden partition is displayed in an explorer or my computer.
That's it! No data is lost or damage. Even the installed files are working again without any errors. From now you shouldn't need any extra software to hide or unhide your PC's drives. And if it helps you, why don't you share or rate this?
This is a great trick you can play on your friends. To disable the display
of local or networked drives when you click My Computer.
1.Go to start->run.Type regedit.Now go to:
HKEY_CURRENT_USER\Software\Mi
Now in the right pane create a new DWORD item and name it NoDrives(it is case sensitive). Now modify it's value and set it to 3FFFFFF
(Hexadecimal) .Now restart your computer. So, now when you click on
My Computer, no drives will be shown(all gone...). To enable display of
drives in My Computer, simply delete this DWORD item that you created.
Again restart your computer.You can now see all the drives again.
Hiding a partition or volume from my computer or explorer is preventing that partition from displaying, but it doesn't mean erasing any data or deleting the volume. Windows OS Disk management system allows hiding drives except the System drive where the OS is installed and the System reserved volume. So, anyone who has administrative privilege or the administrator of the Windows machine can do this task. And the basic trick is, without any drive letter (Ex: C:, D:, E: etc.) Windows OS doesn't recognize any drive or partition and here we are going to remove that letter temporally.
To do this task you need administrator privilege. So, why don't you activate the administrator account and use it.
How to hide a drive:
1. Click right mouse on the computer and select Manage. Select the disk management under storage from the left pane. Or, you can also get the Disk management typing diskmgmt.msc in the run and pressing enter.
 |
| Disk Management |
2. From there click right-mouse on which drive you want to hide and select Change Drive Letters and Paths.
 |
| Change Drive Letter or Path |
3. Now select remove. Don’t worry! This action just removes the drive letter.
 |
| Remove drive |
4. Pressing on the Remove a warning message will be shown and accept it by clicking on yes. It’s just telling you that all programs installed on that drive won’t work or this drive is opened by another program.
 |
| Warning Message |
It’s done! Your selected drive is hidden now.
The hidden drive won’t be appearing to the administrator of the OS unless it is unbidden.
How to unhide the drive:
1. Open the Disk Management as shown above.
2. Right mouse click on the drive which is hidden/removed. Tips: the hidden drive doesn’t contain any drive letter.
3. Choose the Change Drive Letters and Paths and select Add to add drive letter or path to the hidden drive.
 |
| Add hidden drive |
 |
| Assign drive letter |
That's it! No data is lost or damage. Even the installed files are working again without any errors. From now you shouldn't need any extra software to hide or unhide your PC's drives. And if it helps you, why don't you share or rate this?


